Top Playing Making PVC Shakuhachi Writings Taiji Drawings Sculpture Links

How to make a PVC Shakuhachi

Below are the directions for an easy-to-make PVC shakuhachi. For a more challenging technique, click here.
1.8 indicates a shakuhachi length with the lowest pitch at D. 1.6 has the lowest pitch at E.

1.8 (1.6) measurements (in millimeters) from bottom of flute


The diameter of the fingerholes is 10mm. (   ) indicate measurements for the 1.6 length.
Materials:
  • 545-millimeter-long PVC pipe, bore diameter 20mm.
  • PVC joint. (One joint provides enough material for 2 shakuhachi.            joint
  • Manual drill (if you have a drill press, even better) with a 10mm drill bit.
  • Saw, file, knife, sandpaper, wooden mallet, thread, cellophane tape, pencil, ruler, PVC glue.
(1) Apply glue to inside of the joint. While the glue is still wet, fit the pipe into the joint with a twisting motion. Use a wooden mallet to pound the joint the rest of the way on, until the pipe reaches the middle of the joint.(No farther!)
(2)
Use a saw to cut through the middle of the joint.
(3)
File the surface edge of the joint until it is flat with the pipe inside.
(4)
With a pencil, draw a line tangent to the circumference of the inner wall.
(5)
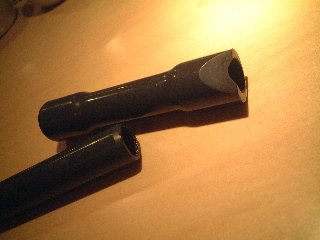
Make an oblique cut along the line drawn in diagram 4 at the angle shown in diagram 5.
(6) File the surface of the oblique cut until it is smooth and the depth of the mouthpiece indentation is 2mm. (The side edge of a grinder or belt sander works really well for this job.)
(7) Use a file to slightly round the back edge of the mouthpiece where it rests against the chin.
(8) Use a saw or a file to adjust the length to 542mm. (Cut from the bottom end.)
(9)
Tape a piece of thread to the center front of the shakuhachi. Use this as a guide to mark the centers of the fingerholes with a pencil. (Refer to diagram at top of page.)
To mark the location of the back hole, cut a strip of paper to the same measurement as the circumference of the pipe. Fold the strip of paper in half, and mark this spot with a pencil. Align the spot with the center front thread, and where the ends of the paper meet in back of the flute is where you mark for the center of the back hole.
(10) Use a 10mm drill bit to open the holes.
(11) Use sandpaper to smooth all the newly cut or filed surfaces, including the fingerholes. Wrap sandpaper around a wooden block for straight edges, and around a pencil for round edges. Use very fine sandpaper to round away a very small amount from the inside of the mouthpiece, as shown in diagram 11. (The final depth of the mouthpice indentation should be around 3mm.)

Your PVC shakuhachi is finished!
(12) Respective scales for the 1.8 (upper) and 1.6 (lower).

Another way to do PVC shakuhachi

The shape of the mouthpiece comes out like this, in a bottle-shape.
The only difference in structure between this version and the easy version is the construction of the mouthpiece, so that is all I will show you here.
A PVC joint is not needed for this version, but you will need a burner instead.
Because the plastic stretches to form the widened shape, it is best to start with a pipe which is 2cm longer (565 mm).
(1)
Materials:

     1) Three PVC pipes, bore diameter 20mm, in the following           l engths:       
  • pipe A, 200mm
  • pipe B, 150mm
  • pipe C, 565mm
     2) A 30- centimeter-long wooden dowel, circumference 20mm.           Hardwood is best.
     
      3) glue

      4) adhesive tape

How to do it:
  • Bevel the edge of one end of pipe A as shown in diagram 1.3.
  • Apply glue to the inside of the pipe and insert the dowel as in diagram 1,4.
  • Wrap 2 layers of adhesive tape around the PVC pipe 3.5 cm away from the beveled edge.
  • Apply a layer of oil (I use petroleum jelly or vegetable oil) to the surface of the plastic between the tape and the wooden dowel.
(2) Heat the end of the 565mm-long PVC pipe (pipe C) over a burner. Heat until the area within 4 to 5 cm from the edge of the pipe becomes soft.
(3)
While the pipe is soft, use a twisting motion to push the tool made in diagram 1 into the pipe. (It should stop at the resistance of the adhesive tape.)
Let the pipe cool in this position. Remove the tool after the plastic is cool.
(4) Bevel the edge of one end of pipe B, and apply just enough glue so that it will adhere, but not overflow, when you push this pipe as far as it will go into the widened pipe C.
Cut as the dotted line in the diagram shows, and continue from diagram 3 in the easy version.
(extra)

Just another idea which I have tried:

By creating a removable mouthpiece as in diagram 1, you can make a shakuhachi with interchangeable parts that have different lengths for different keys, or different fingerholes for different scales (2-4). 20mm pipe can be used for shakuhachi lengths from 1.5 to 2.1. For shorter lengths, use a smaller bore, for longer lengths, use a wider bore. The applications are endless. Have fun! (I'd love to hear about it if you come up with anything interesting.)

to home page